How the Hell do I make a cubemap with my own art?
I was having a really tough time finding tools to create a workflow that allowed me to hand paint an environment and then generate the six images needed to create a cubemap from it. It seemed like such a simple thing. Could I paint directly on a sphere in Zbrush of Mudbox with the uv’s mapped in an equirectangular fashion, and then take this image and have it cut up by some magic tool into a cube map?
No.. forget it. And after weeks of searching for panorama tools and Photoshop plugins I finally stumbled across a quite effortless solution. 3D Studio Max has a basic material – the Reflect/Refract material that one would place on an object that needs to be shiny or reflective at render time, and to create this illusion, the material has a little tool built into it that auto generated the six images that form a cube map.
Basically, anything you place in a scene around your ‘reflective’ object, will be projected onto the cube map images and then could be used in a game engine that uses that convention for generating a skydome or environment map.
For those not familiar, a common game engine convention is to use 6 images to create the illusion of an environment that is persistent around the player’s position. It could be a sky, a forest, a room… In my case it was a cloudy sky over an Island filled ocean plane as the game was at a high elevation looking down.
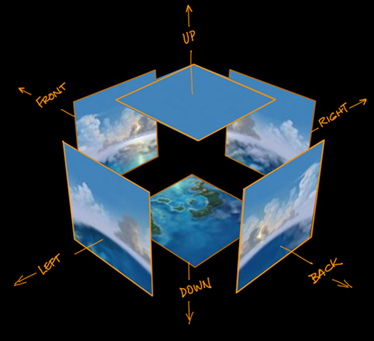
The cube map:
But how to generate it, and as you can see the tricky distortion built into each plane, that when viewed from the player’s position to appear like the curve of the horizon.
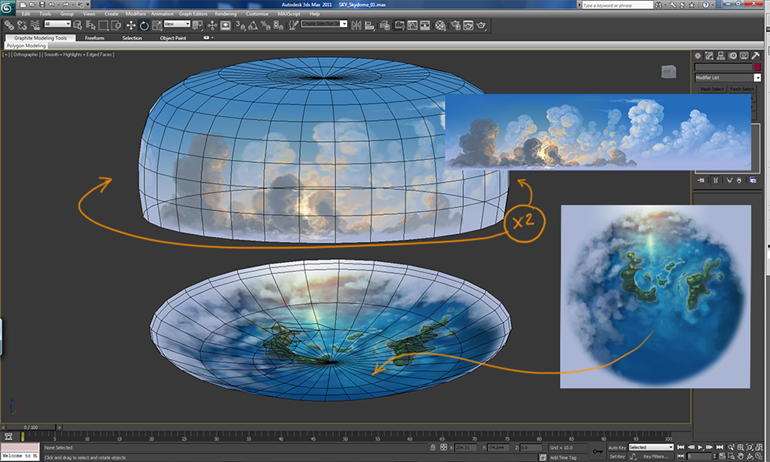
I created a simple squashed sphere or ‘skydome’ in 3D Studio Max, where a long strip of clouds wrapped around the walls of the cylinder, and the bowl of the ocean plane was another. Everything is softly curved and I even added a bit of geo to the islands to add some parallax when I generate the cube map. The sky is separate from the ocean only to show the use of the textures. The ceiling or ‘cap’ of the skydome is just a single pixel of blue stretched across.
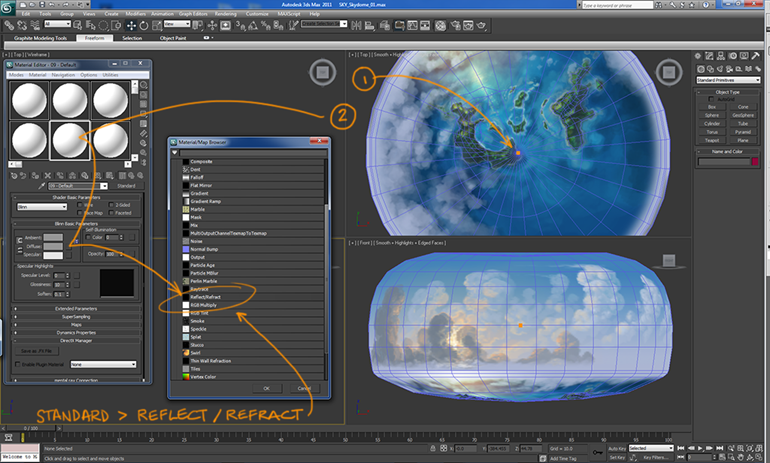
Once you have the skydome assembled, place an object in the center of the scene (or wherever you want the cube map to be generated ‘from’) I placed a small cube. This cube will have the Standard > Reflect/Refract Material assigned to it.
1> Place the cube where you want the ‘point of view’ of the cube map to be.
2> Assign an empty material node to it. Click on the ‘diffuse’ channel button and select ‘Reflect/Refract’ from the pop up menu.
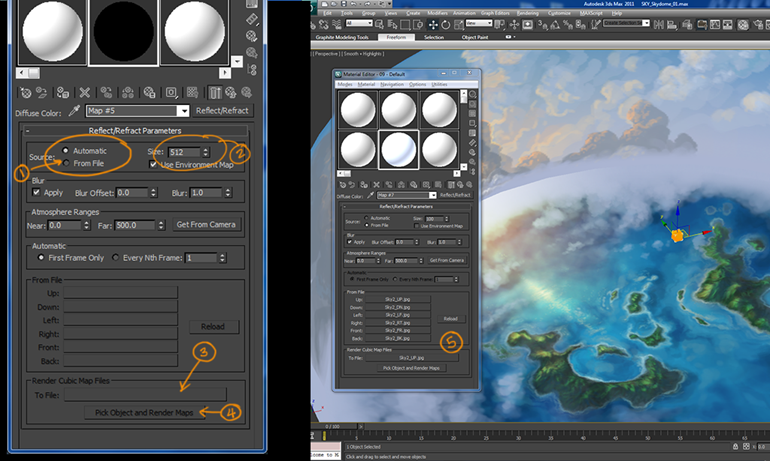
Now the fun part! Once switched to Reflect/Refract, the options dialog panel will appear…
1> Switch the Source from ‘Automatic’ to ‘From File’. Switching to ‘From File’ enables the Render Maps feature below.
2> Enter what resolution you want your cube map images to be. I chose 512 for a nice crisp environment map.
3> Click on the empty ‘To File’ entry field and proceed to save a file. There is nothing to save, but this process is how the tool comes up with what naming convention to use when it generates the maps.
4> Then click ‘Pick Object and Render Maps’ and select the cube object in the center of your scene. A small render window will appear as the tool creates the images and closes.
5> Now you will see your 6 new images listed in the Material.
FINAL STEPS
You’re pretty much done! You now have six images that an be plunked into a game engine for creating an environment map. Mine looked something like this:
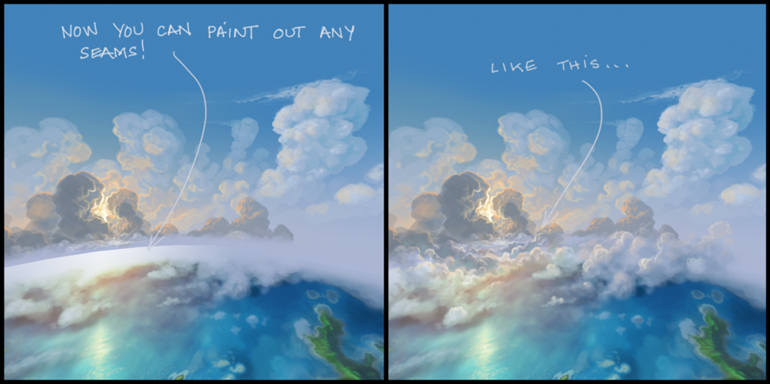
Now, because at the time I created the textures for the skydome there was no way to actually match the bottom of the long 1024 texture to the round ocean plane, once the images are projected you can open them and paint out the seams, but with help of the curved distortion to guide you. Like so…
So there you go. A nice little way to have your hand painted imagery be projected onto the 6 separate images needed to create a cube map… with all the proper distortion.
Happy Game Deving!





Thank you for your step-by-step, which is a bit more helpful than the guide here: http://wiki.polycount.com/CubeMap#Reflect.2FRefract_Map
I am having a problem where when I click the pick button and select the geometry, there is no render window that pops up, and no image files are created. Do you think this is due to my scene using Vray materials instead of standard ones? Has anyone else had this problem or fixed it?
Thanks,
-Ryan
Hey, thanks for liking the tutorial, Ryan!
Well, that is a really good question that I can’t say I have any direct experience with myself. I have never worked with Vray rendering. The assets that I was creating for this project, and how this tutorial came about are all very basic old school gaming assets. I believe the skydome is textured with a basic blinn shader which only has a single diffuse. Nothing beyond that, as the project was a hand painted story book vibe created for a runtime game. (as opposed to a rendered image or animation)
I would be really curious to hear if your suspicion of it not working because of the use of Vray materials is correct. Have you tried a quick experiment scene with nothing but basic diffuse textures on a few objects?
🙂
Hi Ryan,
I came across that very same problem while using the Slate Material Editor (both with standard and mental-ray materials, haven’t got access to V-ray), however after changing over to the old Compact Editor everything worked flawlessly.
Best Regards
Jona
Hello everybody, and Jude thank you sooo much for this REALLY ass kicking tut ! It is simply awesome.
@Ryan and Jona : I had the same problem – the thing is weird :
1. The reflect/refract material, i put it in the reflect slot (not diffuse dont ask me why 🙂 )
2. It only worked with the good old Compact Material Editor – not the one with the nodes since 20 – i dont know when… Jude you agree?
So once again, thank you a lot sir ! Your work is amazing.
Love it!
Pingback: Skydomes | SeniorEnvironmentArtist.com
Hey!
First of all, great art and great tutorial! Very useful 😉
I just wondered how exactly did you unwrap those two objects? Did you use some particular method?
Could you give me some ips about that?
Thanks!
Hello! Thanks for the kind words!
I sent you an email to try and help you understand how it did it… Hope you find it helpful.
Cheers!!
Jude
Oh good, I must go get a license for 3D MAX then.
…
Art and science… I love that, it’s smart, and beautiful !!